
Your laptop keyboard is not useful at this moment. It’s either lagging or giving the input of a wrong key when you press the other.
That might have been due to multiple reasons. For instance, either you dropped it somewhere or spilled some liquid over the keyboard.
However, your entire studying, gaming, professional, and other experiences will hamper if this problem continues.
Now, you don’t want that. You can solve this issue with an external keyboard. In this article we will guide you on how to disable laptop keyboard when external plugged in.
How to disable Laptop Keyboard when external plugged in
#1 Uninstall the in-built keyboard from the Device Manager
The first basic step to learn while knowing how to turn off laptop keyboard when using an external device is this one.
If you are using Windows 7 or higher, these steps will be easier to follow.
Step: 1
Click Windows (icon) from keyboard “⊞+ S” letter on the same keyboard.
It opens up the search bar from the task menu at the bottom of the screen.
If the keyboard does not let you press the “S key“, click the search bar manually from the task menu.
Step: 2
Type the “Device” word in the search bar.
Then you will see the option of “Device Manager” in the search list.
It’s under the “Control Panel” section, by the way.
Click “Device Manager” now.
A new small window opens up on your laptop screen.
Step: 3
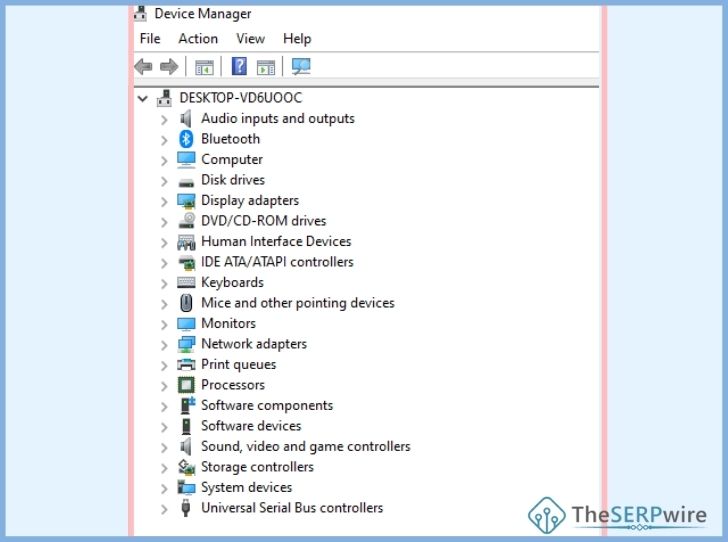
Find the “Keyboards” option there.
Click the “little arrow mark” behind the word “Keyboards” to expand your options.
Step: 4
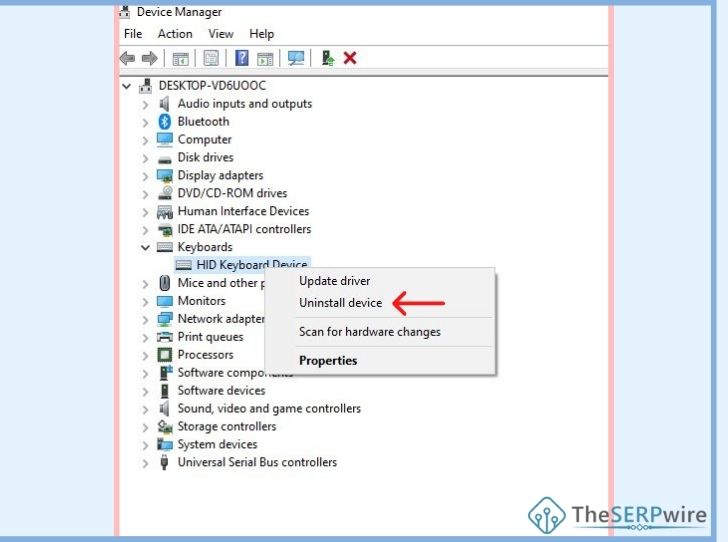
Now right-click the internal keyboard of your laptop.
Then you will get a few options. One amongst them will be to “Uninstall.”
Click it and the internal keyboard will then stop working.
Step: 5
You can then simply click the “X” mark on the windows that have opened.

Go to any word document to test if your inbuilt keyboard is working or not.
Then plug in the external device.
Now type something which you think usually comes out wrong and messed up while using an in-built keyword.
If it comes out smoothly on the word, your external keyboard is fully functional then.
Important:
This solution to disable laptop keyboard when USB plugged in works only till the time your laptop device is switched on. If you reboot it, the operating system will automatically reinstall the in-built keyboard. Then, you will have to repeat the steps to use the external keyboard.
#2 Manipulate your laptop’s in-built keyboard status in Windows Device Manager
Following the first solution would waste your time. You will be doing that first solution repeatedly whenever you turn the system on. Now, not every one of you will have that much time to spare. It even gets irritating at one point.
Besides, following the previous step will only delay all your work, leisure, and general experiences on the laptop.
Thus, the matters concerning your “can I disable laptop keyboard when using external devices like USB or wireless keyboards” are solved easier in this solution.
Step: 1
Open the “Device Manager” from the search option in the task.
Step: 2
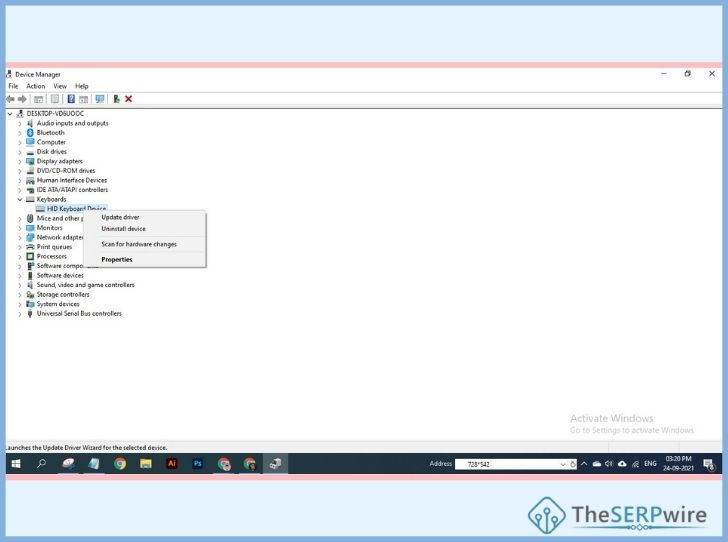
Next, click the “Keyboards” option and expand it using the given arrow option.
This time, you right-click and select the “Update Driver” option.
Step: 3
A prompt window will open up, probably asking you to run an online check or update the existing drivers only. Choose the latter option.

In this case, my system is showing “Search automatically for driver” and “Browse my computer for driver” options.
So, I would choose “Browse my computer for driver” to upgrade the existing one.
Step: 4 (If you get the first set of options and not like mine):
Now, de-select the option “Only use compatible drivers.”
Otherwise, you can also choose to display incompatible drivers in the list.
Just do any one of the two options. Then restart the system.
You will note that your laptop’s in-built keyboard and touchpad get disabled.
So, now you can start using the wireless or the USB-connected keyboard for a seamless experience.
Important:
To get back to your in-built keyboard, follow the similar steps and choose “The compatible driver” this time. Again, restart your system. The in-built keyboard and touchpad will start working again.
#3 Disable and lock keyboard with batch file
If you know coding and programming well, you can create batch files and use DevCon commands in the DevCon.exe file to install, reinstall, update, disable, and configure the keyboard, touchpad, and other devices listed in the Device Manager.
You don’t have to manually click here and there, as mentioned in the first two solutions. As per this solution, a DevCon.exe file with the right commands can do the deed within seconds.
#4 Use keyboard locker software to turn off laptop keyboard
This is a third-party software related method. I personally haven’t tried this one. But tech-geeks and tech-lovers can try different apps and software available online.
Often these software ease the burden effectively in knowing how to lock laptop keyboard when using external keyboard.
But before downloading and using any keyboard locked software, read its reviews – Google or the ones from established tech-geeks. Also, refrain from downloading software from fishy, unstable, and unprotected websites.
Step: 1
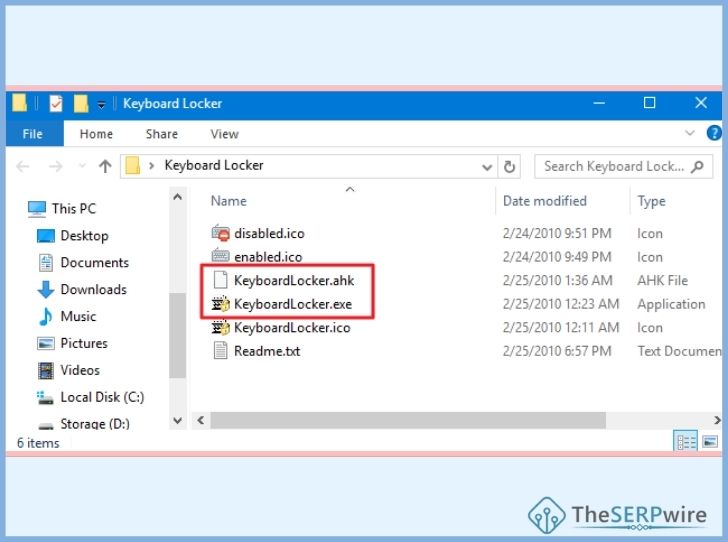
Once you have selected a software, install the app and save it in a folder.
Unzip it and find the .exe file in its folder.
Step: 2
At times, there are .ahk files too for using the AutoHotKey options to edit and modify the software script yourself.
But only do so if you have experienced it before. You don’t want to further make a mess out of your current laptop system.
Step: 3
Moving ahead, double-click the .exe file to run it smoothly. It will somewhere pop an icon on your screen or the taskbar.
When you right-click that icon, you can quickly disable the laptop keyboard when using an external device.
Step: 4
Right-click that icon again to enable or unlock the keyboard after you’re done using the external one.
Also note, some software don’t lock all the keys in the in-built keyboard/touchpad for security purposes.
To confirm, check the software or app description and review in detail.
Otherwise, test the in-built keyboard even after you’ve disabled it.
#5 Transfer the laptop screen to an external monitor or device:
Another way to turn off laptop keyboard when using external system or device is this one. In this case, your laptop and other monitor needs a VGA or HDMI port. So that you can connect both devices and duplicate the laptop screen onto the other device.
In this device, you will be using another or external keyboard, mouse, and screen. So, when you connect the laptop with the external device through VGA, the latter device continues to work even when the former one hibernates or sleeps due to inactivity.
Also Read: Why does laptop perform worse when plugged in?
Conclusion:
I have stated the five most commonly tried steps to lock and disable laptop keyboard when external plugged in. My motive is to make your laptop experience easier and not let the in-built keyboard give you any added stress.
Try any of the 5 steps mentioned above but don’t start experimenting on someone else’s laptop. If nothing works, consult a technician or an IT expert. And also read an ultimate solution guide for solve your laptop noise issue when it’s plugged in.